
A breakout-and-retest setup develops through a sequence: a meaningful boundary breaks, price moves away, then returns to test whether the market can remain on the new side of that boundary. The value of the retest is not that former resistance must become support or former support must become resistance. It is that the trader receives more information about acceptance, structure, location, and invalidation before deciding whether continuation still deserves attention. The Opening Range Breakout framework applies the same discipline to a defined first-30-minute boundary.
What a Breakout and Retest Actually Is
In a bullish example, price trades below meaningful resistance, breaks above it, moves away, and later returns toward the broken area. The trader then watches whether buyers can defend or reclaim the new side while the continuation structure remains intact. A bearish example is the inverse: support breaks, price moves lower, returns, and sellers either defend the new side or allow price back into the old structure.
Not every breakout provides a clean retest. Some moves continue without returning far enough to create the setup, while others become messy around the level and never establish useful acceptance. Missing the retest does not turn a late chase into the same trade.
Start With a Boundary That Mattered Before the Break
A breakout only has meaning relative to the structure being broken. Established support or resistance, previous highs or lows, range boundaries, session extremes, higher-timeframe structure, and well-defined consolidations can all matter, but the area should be important before price breaks it. If a boundary becomes “key” only after the chart worked perfectly, hindsight has replaced planning.
Fidelity describes support and resistance as areas where supply and demand interact and notes that broken resistance can often become support while broken support can often become resistance. It also cautions that technical analysis is interpretive rather than exact. Former resistance is therefore a location to evaluate, not a magical floor. (fidelity.com)
A Break Is Not Yet a Successful Breakout
Price moving through a level proves one thing: price moved through the level. It does not by itself establish sustained acceptance, follow-through, a new trend, future support, or a valid entry. The market can break and continue, break and retest, break and fail, or chop around the boundary without giving a clean answer.
CMT Association material on false breakouts makes the same broader point: technicians often look for additional evidence before treating a break as established, including how price behaves after penetration of the boundary. Fidelity likewise describes a structural break as a warning that conditions may be changing rather than proof that a new trend is already confirmed. The trader’s job is therefore to evaluate what develops after the break instead of reacting to the break itself. (cmtassociation.org, fidelity.com)
Why the Retest Can Improve the Decision
Waiting for a retest can provide more information because the trader sees how price behaves after the initial breakout. It may also offer a cleaner location near the structural boundary and make invalidation easier to define. Those are potential advantages, not guarantees.
Sometimes the retest is volatile, penetrates deeply, leaves a wide logical stop, or arrives after most of the available room has already been consumed. A retest can improve trade structure, but it does not automatically improve it. The pattern still has to earn risk through context, location, invalidation, and room.
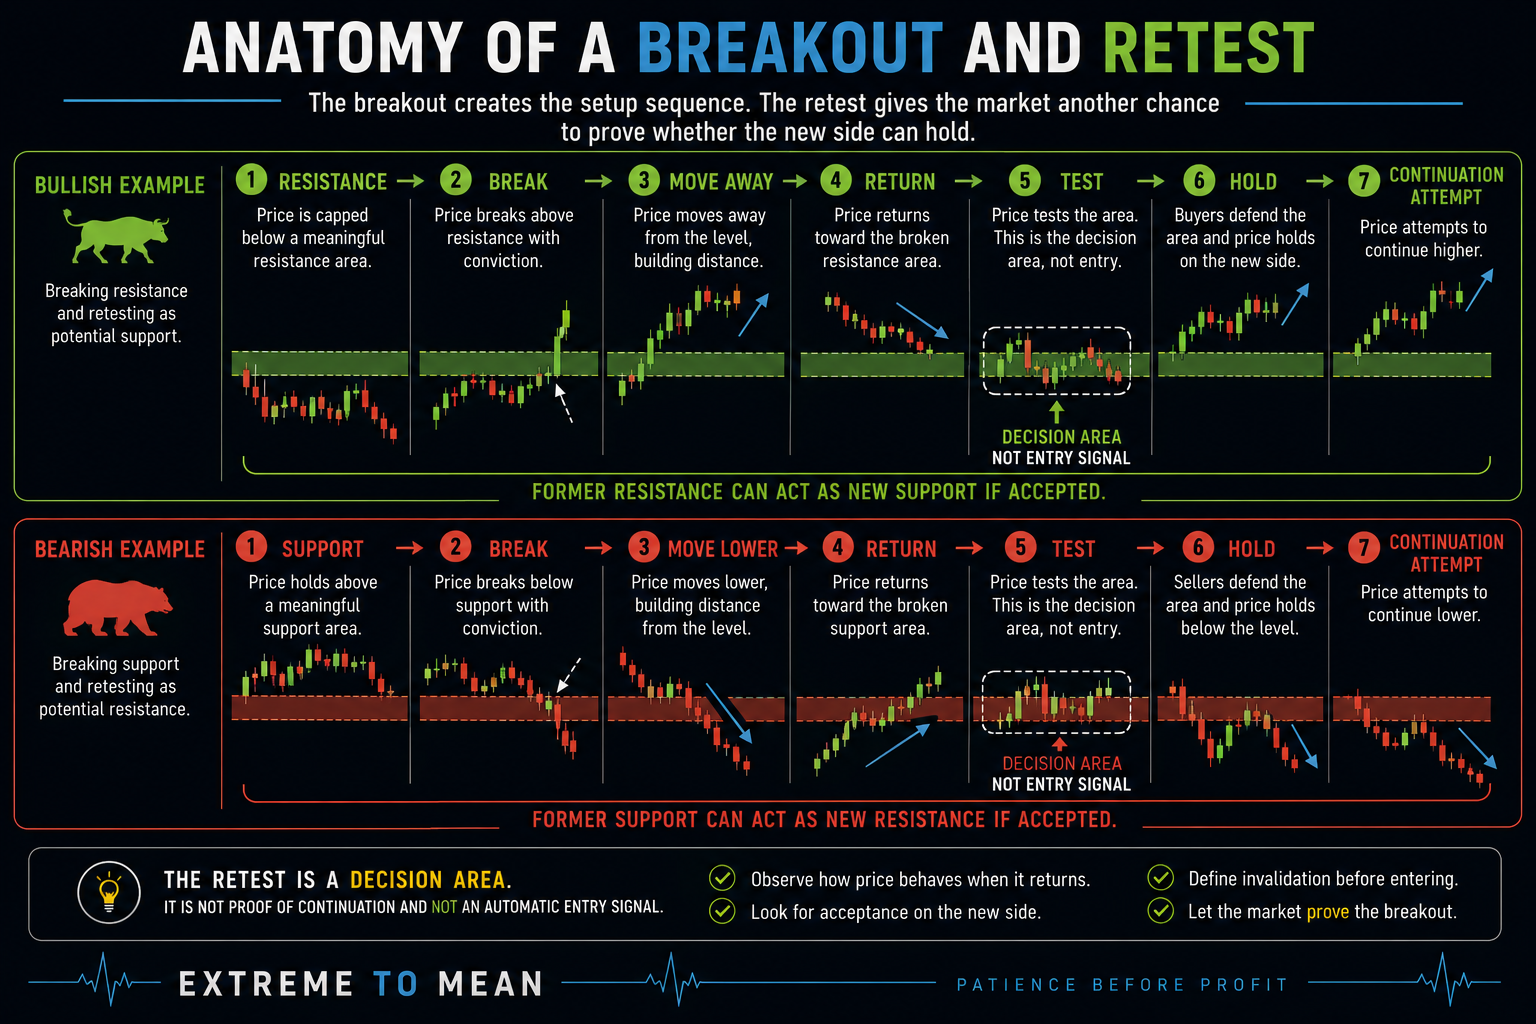
The Retest Is About Acceptance, Not a Perfect Touch
A useful retest does not need to touch one exact price and reverse immediately. Price may stop short, slightly penetrate the old boundary, test a broader zone, or spend time around the area before resolving. This is why a good location is a zone, not a perfect price.
The better question is not, “Did price touch my line?” Ask, “Is the market accepting the new side of this area or returning to the old structure?” A line organizes the chart; behavior around it determines whether the breakout thesis is strengthening or weakening.
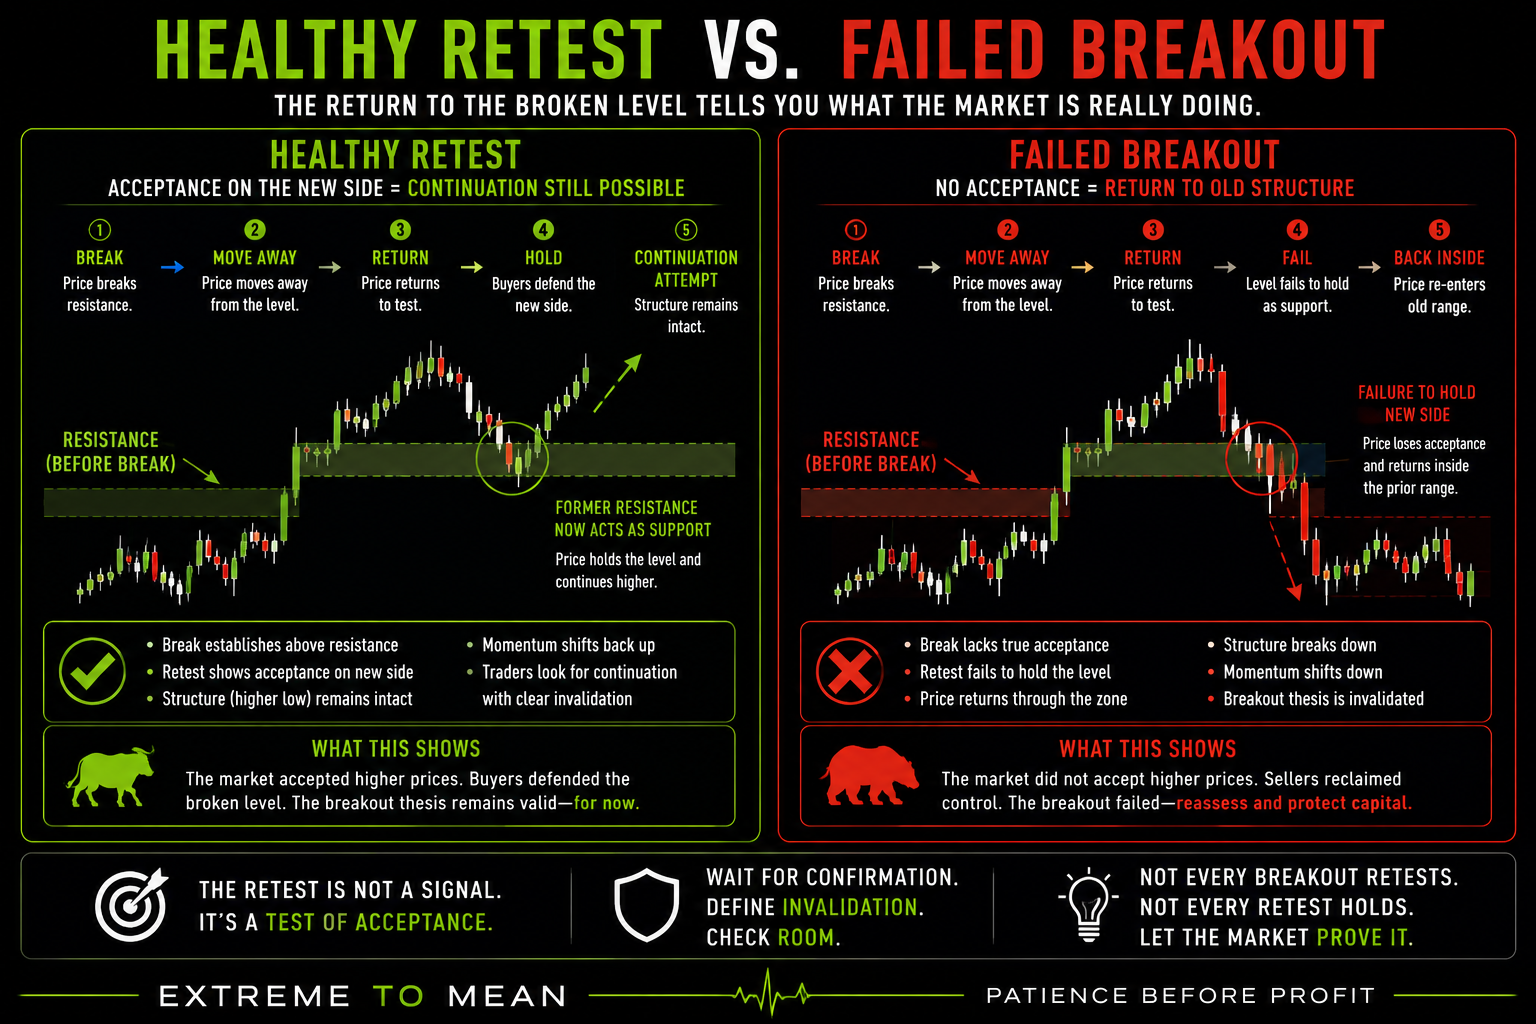
Healthy Retest vs. Failed Breakout
On a bullish retest, selling pressure may slow, the former resistance area may attract buyers, and price may hold or reclaim the broken zone. A higher low, momentum shift, rejection, or renewed follow-through can add evidence without becoming an automatic trigger. The bearish version is the inverse: buying pressure slows near former support, price struggles to regain it, and lower-high or downside structure may begin to develop.
A failed breakout looks different because price can no longer maintain the new side of the boundary. Repeated acceptance back inside the old range, failure of the former boundary to hold its new role, or new opposing structure can damage the continuation thesis. There is no universal one-candle definition; the distinction depends on the level, timeframe, volatility, depth of return, and original invalidation logic.
| Feature | Healthy Retest | Failed Breakout |
|---|---|---|
| Original level | Defined before the break | Defined before the break |
| Break | Establishes beyond boundary | Briefly exceeds boundary |
| Return | Tests broken zone | Re-enters prior structure |
| Acceptance | New side begins holding | Old structure regains acceptance |
| Structure | Continuation remains intact | Breakout structure deteriorates |
| Trader response | Evaluate setup | Reassess or invalidate |
| Automatic trade? | No | No |
A failed retest is not something to explain away. If the setup depended on acceptance beyond the broken boundary, loss of that acceptance is new information. The trader should update the thesis rather than defend the original breakout.
Why Chasing Changes the Trade
Suppose resistance sits at 21,500 and price quickly trades 21,505, 21,515, 21,530, then 21,550. The move may look increasingly convincing while the entry becomes farther from the original invalidation and closer to the next opposing area. The trader can become more confident about direction while simultaneously accepting worse location.
That is why where you enter matters more than what you predict. A late entry can face more normal pullback risk, more emotional pressure during a retest, and less available room. If price breaks and runs without providing the planned setup, there may simply be no trade.
A missed breakout also does not become a retest because the trader wants another chance. Moving the retest zone toward current price, calling a random pause the retest, or dropping through timeframes until some tiny pullback appears changes the setup after the fact. The setup has to remain recognizable even when the market is moving without you.
Context, Confirmation, and Risk Still Decide the Trade
A breakout from a clean range boundary during supportive directional conditions is not the same as a minor break inside chop. Ask whether the boundary matters, whether the market is trending or rotating, whether volatility supports movement, whether higher-timeframe structure agrees, and whether enough room exists beyond the break. The Setup curriculum treats the pattern as only one part of qualification.
Confirmation belongs after location and structure. A cleaner sequence is Meaningful Boundary → Valid Break → Return → Structure Holds → Confirmation, with rejection, momentum shift, reclaim, higher low or lower high, follow-through, or participation used as supporting evidence rather than mandatory triggers. A candle cannot rescue a breakout that never mattered.
Risk has to follow the same logic. Before entry, determine what behavior would show that the retest is no longer holding and whether the next opposing area leaves enough room for the trade to make sense. The trade is not ready until the risk is clear.
Breakout Retest Is Continuation, Not Mean Reversion
A breakout-and-retest setup is generally a continuation concept: price escapes a boundary, returns to test it, and the trader evaluates whether continuation away from the old structure remains plausible. Mean reversion asks a different question—whether price has stretched far enough from balance for conditions to support movement back toward it. Keeping those ideas separate prevents every return toward a level from being labeled the same setup.
A Practical Breakout-and-Retest Decision Sequence
Use Boundary → Break → Return → Hold/Fail → Confirm → Risk → Decision. The sequence keeps the trader focused on what the market has actually proven and prevents the breakout candle itself from becoming the trade. Only after location, acceptance, invalidation, and available room are clear does the setup earn consideration.
- Define the boundary: What meaningful area matters before price arrives?
- Observe the break: Did price leave the area in a meaningful way?
- Do not chase: If price becomes extended, allow the move to go.
- Observe the return: Did price actually retest the broken area?
- Evaluate acceptance: Is the market holding the new side or returning to prior structure?
- Wait for qualification: Is continuation still supported by the evidence?
- Define invalidation: What would prove the retest thesis wrong?
- Check room: Is there enough structural room for the trade to make sense?
- Decide: Only now determine whether the setup deserves risk.
The better question is not, “Did price retest the breakout level?” Ask: “What did the market prove when it returned to the broken area?” Then ask: “Is the market accepting the new side of the level—or slipping back into the structure it supposedly escaped?”
Final Thought
The breakout is not the trade, and the retest is not automatically the trade either. The retest matters because it gives the market another chance to show whether the broken boundary is gaining acceptance on its new side or whether the breakout is losing structural credibility. Better information and potentially better location are useful only when confirmation, invalidation, context, and available room still support the idea.
A trader does not need to chase a breakout that never returns, invent a retest after missing the move, or assume that a broken level must reverse roles perfectly. The job is to evaluate the return and let the evidence decide whether continuation still deserves risk. Readers who want to go deeper into how structure, participation, volatility, and broader context shape individual price moves can continue with Decode the Market.
Educational content only. Trading involves substantial risk and is not suitable for everyone.